How to Hook Up Surround Sound for Quality Sound

sound-529285_640

Hooking up a surround sound to a TV is a four step procedure that can easily be accomplished. It entails; connecting the speaker to the TV, covering the cables, testing it out and making the necessary adjustment so that it produces quality and entertaining sound. The challenge here is making sense of the speaker cable and ensuring that they are safe.

shopnow_button

The following procedure should be followed if you want to get the best results.

Check the available speakers because the number of speakers you want to make use of determines the surround sound you use.

Use:
• 2.1 For the subwoofer two front speakers
• 5.1 For the two surround speakers, front speakers, center speaker and subwoofer.
• 7.1 For the one center, two back, two fronts and two surround subwoofers

Ensure that the subwoofers are not placed against the walls and the corners because if you do this, it will amplify the bass and make it difficult to control it. You may then hook up the surround sound step and have the front speakers placed to the sides of the TV. Check the left and the right markings to ensure that the speakers are placed on the right side of the TV. However, they should be placed three feet away from each other.

Ensure that each of the speakers is angled towards the audience but should paint directly to the seating area.

Hooking Up Surround Speakers for Quality Sound

For the best audio sound, the speakers should be raised so that they are at the same level with the ears of the audience. You can make use of speaker stands to achieve better results. The other center channel speakers should be placed below or above the TV. The center channel can be used to bridge the gap between the right and the left speaker.
Ensure that the center channel is angled so that it points at the audience while the surround channel speakers should be placed to the side of the viewing area. This ensures that the back speakers do not transmit more sound than what is being received from the front speakers.
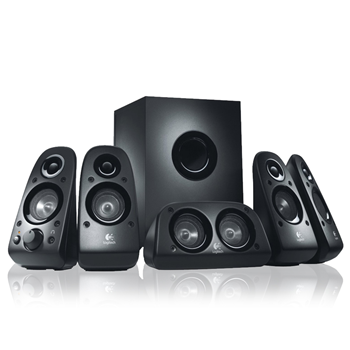
 Logitech Z506 5.1 Surround Sound Speakers
Logitech Z506 5.1 Surround Sound Speakers

You can place the surround speakers on the sides of the viewing area but they must be pointed at the audience. Alternatively, you can have them placed at the audience and should be placed at an angle of between 90o to 110o to the TV.

Alternatively, you can have the surround speakers raised about two feet above the ear level. They should be angled down so that the point at the audience and provide the best auditory experience. You can make use of stands or furniture. Similarly, you can place the back channel speakers behind the viewing area but make sure that you place the two speakers close to each other. If you want to create a bubble of sound around the audience, check and ensure that the back channel speakers are more ambiance and can surround the support speaker.

To get the best sound, you need to place the receiver near your TV. Ensure that the surround systems are run through the receiver so that it can process the sound input and send signals to other speakers connected to it. To get the best sound, the speaker should be near your TV so that the cables can reach all the spaces available.

If you are doing this job by yourself, it is important to remember to power off the machines before installing the speakers. This is to reduce chances of being electrocuted. In fact, it is recommended that you plug off the TV from the wall.

Once you are through with connecting, you must examine the speakers and ensure that surround systems and the speakers are properly connected. If you decide to use clips, you must ensure that you utilize wire strippers in exposing the underneath wires. As you run the wires to each of the speakers, do everything you can to ensure that the wires are hidden to look better and that people and animals are protected from accidents and tripping that can be caused by the speakers. Running the wires under the carpet or through walls is recommended and will give it a clean look.

shopnow_button

The Top Five Home Weather Station Brands (2015)

norman-79860_640

Having good weather station equipment is an absolute necessity for every weather enthusiast. A good home weather station is critical for taking up to date measurements of humidity, indoor and outdoor temperatures, as well as the local weather forecast. To get a review of the top five home weather station brands then read on.

shopnow_button

1. Ambient

Ambient weather has since 1998 been at the helm of the weather forecaster and weather station market. Ambient weather seems geared towards providing good quality home weather stations at pocket friendly prices. Notable models under the brand include WS-1171, WS-1090, and WS-2080.

In combination with their Virtual Weather Station software, Ambient weather stations are some of the most popular and provide a powerful platform for sharing personal weather data online in real time. Reviews for the Ambient weather stations show that they are reliable and accurate.

Probably the most striking difference between Ambience and other manufacturers of weather stations is their commitment to customer service and quality. Ambient’s customer care representatives review all reviews for the company’s products online and responds appropriately.

2. Davis Instruments

Davis Instruments is one the best makers of weather stations in the market and this is not some self-promoting by the manufacturer. Reviews online reveal that the Davis Instruments name keeps getting a mention whenever there is a discussion regarding best home weather stations.
Davis Instruments devices are known for their dependability and accuracy and the brand is regarded as a leader in the manufacture of high-end weather stations. The company’s products can get expensive. However, if you regard yourself as a weather aficionado then you need to give Davis Instruments serious consideration. Some of their notable brands include 6250 Vantage Vue, Vantage Pro 2, and Vantage Pro2 Plus.

3. La Crosse

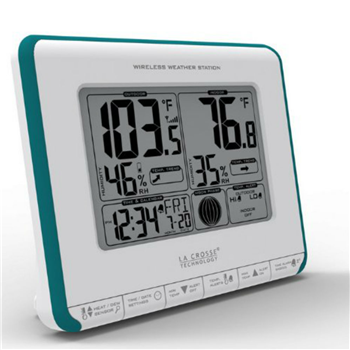
La Crosse Technology 308-1711BL

La Crosse makes a full range of weather station products. Regardless of application, you will always find a La Crosse weather station that matches your needs. La Crosse’s product line ranges from simple thermometers to professional grade weather stations that gather and analyze large amounts of weather data.

La Crosse works in collaboration with the Weather channel when designing weather stations. The company has many models on the market that are well regarded according to reviews. Some of their notable models include Combo 11-IT, WS-2812U-IT, and WS-7014CH-IT. The company also provides downloadable software that makes its products compatible with third party weather websites.

Even though reviews indicate that the company’s products are sound, they also reveal that the company’s customer service is not as responsive as that of other companies.

4. Oregon Scientific

Oregon Scientific has been in the business of inventing and designing home weather stations since way back in 1989. The company markets a full range of weather stations that meet every budget. The company has a reputation of having some of the best wireless weather stations in the market. Some notable brands include WMR 100, WMR 200, and WMR 80.

Reviews of the company’s products reveal that their products work really well when they do. The range of wireless transmission and signal strength on Oregon Scientific devices are on par with other highly regarded companies.

Even though the company has wonderful products, the main problem associated with the company according to reviews is the woefully inadequate customer service department. Even in the case of positive reviews, you will still find complaints of substantial delays in response.

5. Acu-Rite

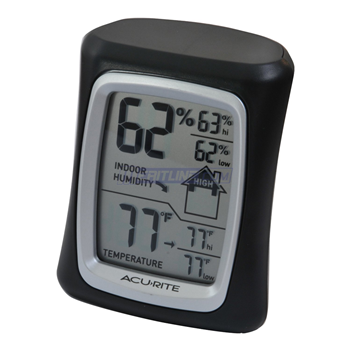
AcuRite 3" Digital Humidity & Temperature Comfort Monitor
AcuRite 3″ Digital Humidity & Temperature Comfort Monitor

Acu-Rite uses their proprietary Acu-link technology to allow users to monitor weather conditions with their own PC mobile devices and right in their own backyards. Using these devices you can track such information as weather forecasts, humidity, temperature, rainfall, and pool water temperature.

You can set the devices up to send to you customized text message alerts or emails whenever conditions change such as impending storms, high or low temperatures, high winds, or even sudden drops in barometric pressure.

You can view the data from your Acu-Rite weather station through the My Backyard Weather PC based web application or through the Acu-Link mobile application for Android and iPhone mobile devices.

Acu-Rite devices have a reputation for being easy to install and set up. According to reviews, they are also durable, long lasting, and notably precise. Most of Acu-Rite’s devices have touchscreen displays with backlighting.

Some of Acu-Rite’s notable models include Acu-Rite 01015 and the Acu-Rite Deluxe Wireless Weather Center.

In conclusion, this has been a review of the top five home weather stations in the market. By now, you should have an idea of how each brand is like and can now make an informed choice regarding your purchase.

shopnow_button

Information on How to Capture Video on PC

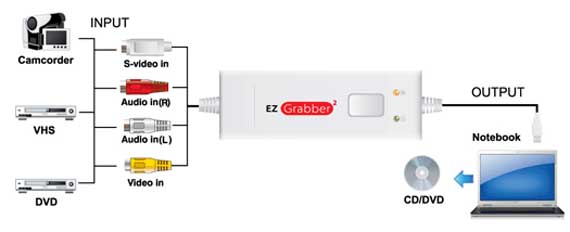
ezgrabberdiagram

Having the knowledge on capturing videos using your PC has many great applications. There is software you can use with your PC to capture videos, Movie Maker and iMovie are examples this article is going to base on. The term video capture refers to the process of transferal analog videos from video capturing devices like a Video Home System or a Camcorder. The new copy of the video that has been formatted can now be edited and copied to DVDs, viewed from the computer or even uploaded to the internet. Several recent analog recording devices allow for DV pass-through technology. This means it permits you to capture videos without having first to install special hardware components for video capture.

shopnow_button

This article is going to teach you how to capture videos from a Digital Video camera using a FireWire cable. The applications that will be used are Movie Maker for Windows and iMovie for Apple. The article is also going to teach you how to use Digital Video pass technology in a Digital Video camera to capture videos from analog devices (for example the VCR).

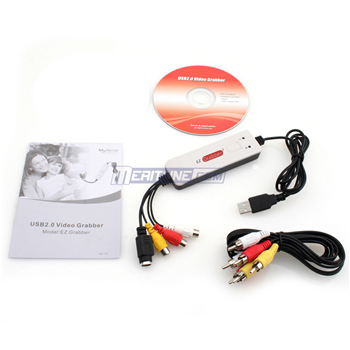
Mygica EZgrabber2 USB 2.0 Video Capture

How to Capture a Video Using Movie Maker

– Start by connecting the DV device to your PC. Find the FireWire port on your camera and plug the FireWire cable. Connect the other end of the cable to any free USB port on your PC.

– Set your camera to the VCR or VST mode. When your device is connected, a dialog box automatically opens, on this dialog box, click on import video.

– Give your video file a name by typing it’s name then choose the memory location on your hard drive to store it.

– Select a format for the video from the list of options and then click on next.

– Capture your video file. To get the video on your computer, click on ‘import entire video to my computer’ then click on next. The menu is going to display some progress report, and a notification is going to prompt you once the conversion is complete. By now, you will be having a digital copy of your analog video saved in the memory location you selected in the third step.

Using Movie Maker to Convert Analog Video to Digital.

– Start by changing the settings of your DV camera to pass-through. This is to enable the analog-digital conversion feature.

– Use either an S-Video or a composite video cable to connect your analog device to the DV camera.

– Import the analog video to your PC. Your DV camera is not going to do the analog to digital conversion. You, therefore, will need to import the video to your computer using the record feature present in Windows movie maker. To do this, set your Digital Video camcorder to VCR/VST mode, and then in the Autoplay dialog box that shows up, click on import video. Name your video in the name field and then choose the right format for the video. Select the memory location to store your video, and then click on next.

– After the importing process is complete, you are going to have a digital copy of the analog video, and it will be located in the memory location you had selected.

Using iMovie and DV Camera to Convert an Analog Video to Digital.

– Begin by importing the analog video into the iMovie application: To achieve this, set your DV camera to VCR/VST mode, then using a FireWire cable, connect it to the computer. An import window opens automatically.

Convert the video file: Check on the switch on the left-hand side of the import window is on Automatic, then click on import. Choose a memory location to save your project by selecting the ‘Save to’ on the popup menu. Give your project a name on the Create new field then click on OK. The process of analog-digital conversion is complete.

The processes above on capturing videos to your PC are based on the default Windows and Apple video capture software. There is other video capture software out there that you can use to serve the same purpose. The Windows 7 operating system does not come with the Movie Maker, although it can be freely downloaded from Microsoft.

shopnow_button